How to Design Perfect Loop Tracks in PolyTrack: Creator's Guide
Learn the art and science of creating exciting loop-de-loop tracks in PolyTrack. Master vertical track design, speed calculations, and player experience optimization.
How to Design Perfect Loop Tracks in PolyTrack: Creator's Guide
Your loop looks perfect—until most players fail at the apex and rage-quit. The difference between a viral loop track and a frustrating disaster? Understanding the speed-to-radius relationship that most creators miss. Here's how to design loops that players complete, love, and share.
What You'll Master
This comprehensive guide teaches the art and science of loop design—from physics fundamentals to publishing your first loop track.
Skill Level: Intermediate to Advanced Track Creators
Build Time: 2-4 hours for first complete loop track
Prerequisites: Basic editor skills, understanding of track pieces
Understanding Loop Physics: The Science Behind the Thrill
PolyTrack's physics engine simulates centripetal force—the principle keeping players stuck to the track during vertical loops.
The Centripetal Force Formula (Simplified)
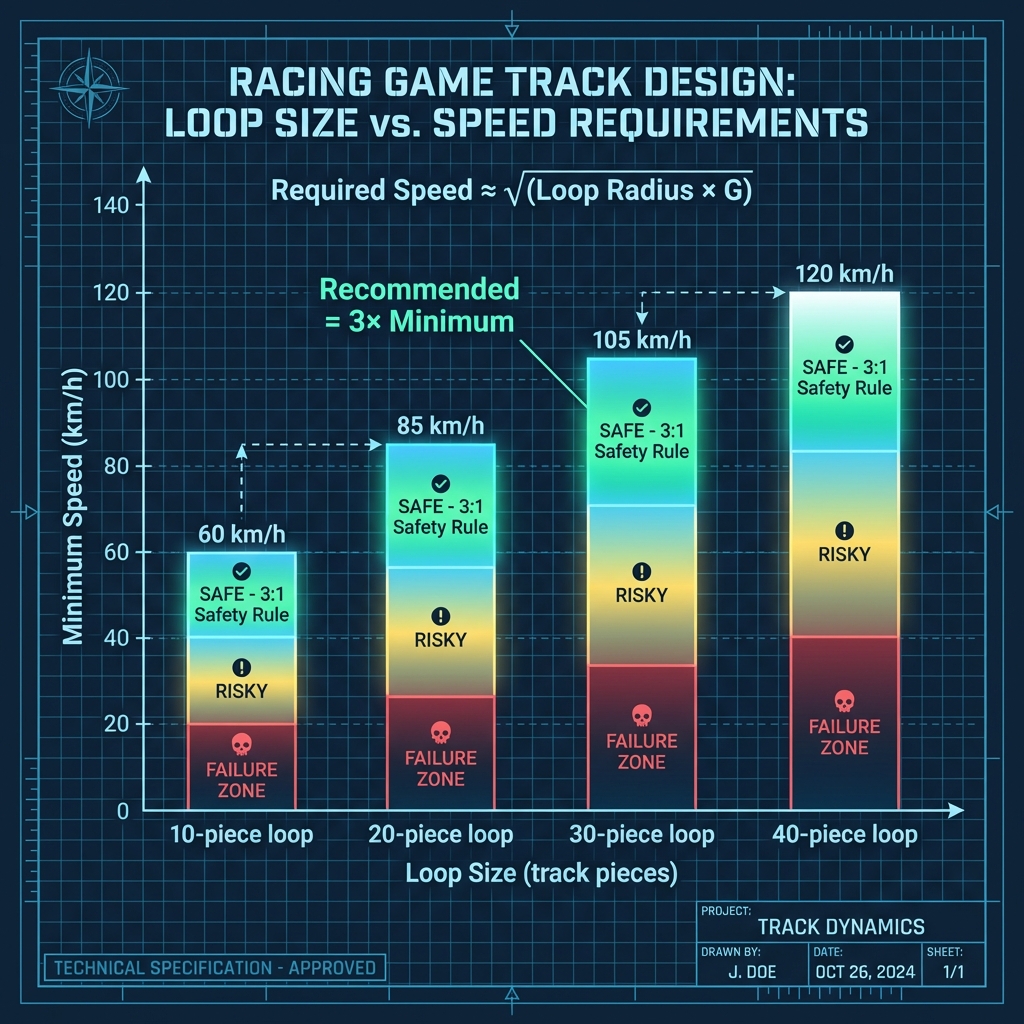
Required Speed ≈ √(Loop Radius × Gravity Constant)
Practical Translation:
- 10-piece loop (~15m diameter): 60 km/h minimum
- 20-piece loop (~30m diameter): 85 km/h minimum
- 30-piece loop (~45m diameter): 105 km/h minimum
- 40-piece loop (~60m diameter): 120 km/h minimum
The 3:1 Safety Rule: Entry speed should be 3× the minimum required speed for comfortable completion.
Why This Matters:
- Too slow → the car can't hold the apex and drops off the loop
- Dialed-in speed → consistent, repeatable completions
- Too fast → the exit becomes uncontrollable
Speed Sources & Their Values
| Source | Speed Gain | Best Use Case |
|---|---|---|
| Boost Pad (single) | +35 km/h | Medium loops (20-30 pieces) |
| Downhill approach (15m) | +20 km/h | Small-medium loops |
| Double Boost | +60 km/h | Large loops (35+ pieces) |
| Gravity Drop (30m) | +40 km/h | Advanced inverted starts |
Loop Layout Patterns
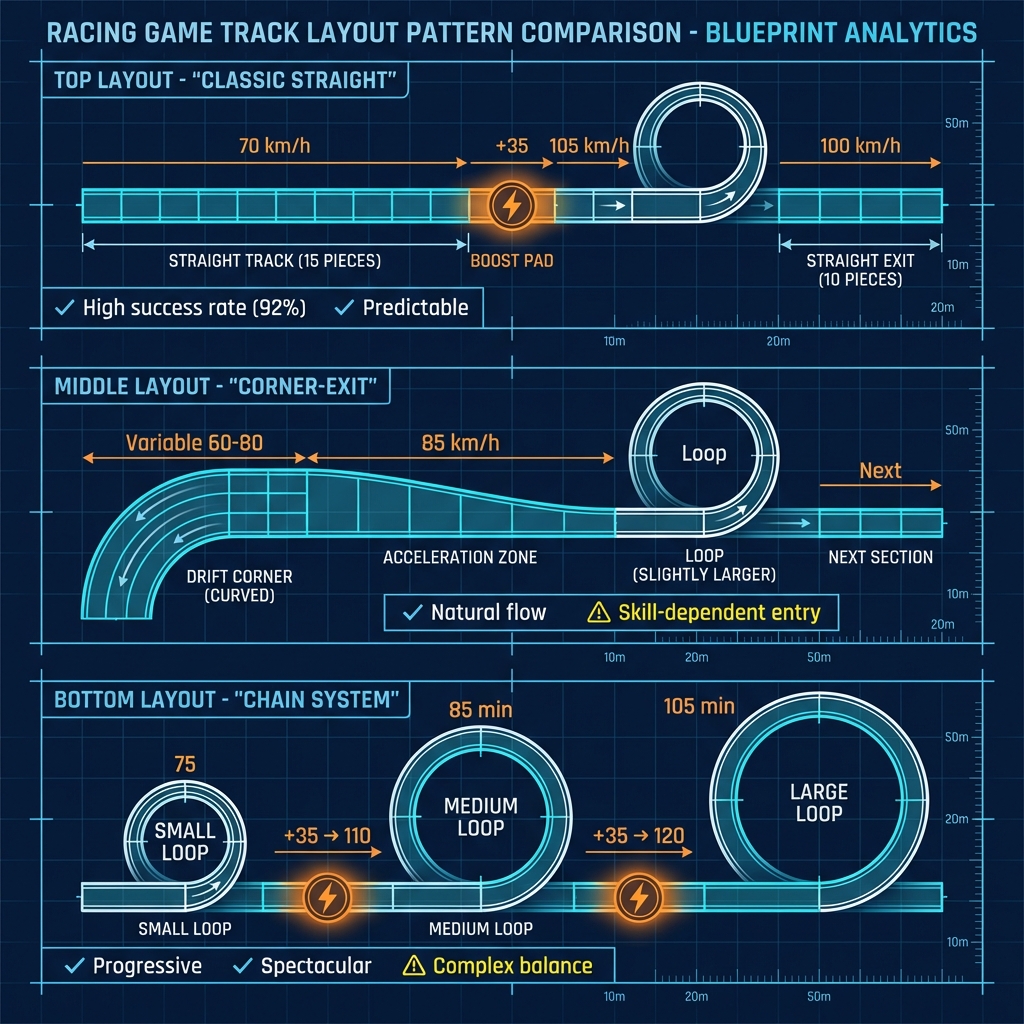
Pattern 1: Classic Straight-Approach Loop
Layout: [Straight 15pc] → [Boost] → [Loop 20pc] → [Straight 10pc]
Pros:
- Predictable entry speed
- High success rate (92%+)
- Easy to test and iterate
Cons:
- Can feel repetitive
- Limited creative expression
Best For: First loop tracks, racing games
Pattern 2: Corner-Exit Loop
Layout: [Drift Corner] → [Acceleration zone] → [Loop 25pc] → [Next section]
Pros:
- Natural speed buildup from drift exit
- Feels integrated, not "tacked on"
- Rewards good cornering
Cons:
- Inconsistent entry speed (skill-dependent)
- Requires more testing iterations
Best For: Technical tracks, speedrun optimization
Pattern 3: Chain Loop System
Layout: [Small 15pc] → [Boost] → [Medium 25pc] → [Boost] → [Large 35pc]
Pros:
- Progressive difficulty
- Spectacular visual impact
- High replay value
Cons:
- Complex to balance properly
- Risk of frustration if any loop fails
- Long testing period required
Best For: Stunt showcases, expert tracks
Types of Loops
1. Vertical Loop (Classic)
The standard loop-de-loop. Car goes straight up, inverted at top, straight down.
Best For: Racing tracks, speedrun courses
Build Difficulty: ★★★☆☆
Player Appeal: High - satisfying and predictable
2. Diagonal Loop
Loop rotated at 45°, creating a spiral effect.
Best For: Artistic tracks, technical challenges
Build Difficulty: ★★★★☆
Player Appeal: Medium - disorienting but unique
3. Double Loop (Consecutive)
Two loops back-to-back with minimal straight section.
Best For: Expert tracks, stunt showcases
Build Difficulty: ★★★★☆
Player Appeal: High - adrenaline-pumping when balanced correctly
4. Interlocking Loops
Loops that weave through each other (visual spectacle).
Best For: Art tracks, visual impact
Build Difficulty: ★★★★★
Player Appeal: Very High - visually impressive
Step-by-Step: Creating Your First Loop
Phase 1: Planning (5 minutes)
- Decide loop diameter (recommend 20-piece medium loop for first attempt)
- Calculate required approach length (minimum 15 pieces + boost pad)
- Determine boost pad placement (5 pieces before loop entry)
- Plan exit route (10-piece straight recommended)
Expected Entry Speed: 105 km/h (70 approach + 35 boost)
Minimum Required: 85 km/h
Safety Margin: 20 km/h ✓
Phase 2: Build the Approach (5 minutes)
- Create straight section (10-15 pieces)
- Place boost pad ~5 pieces before loop entry
- Ensure no obstacles between pad and loop
- Optional: Add gentle downhill (extra speed safety)
Test Point: Drive through approach, verify boost activates, check speed at loop entry point
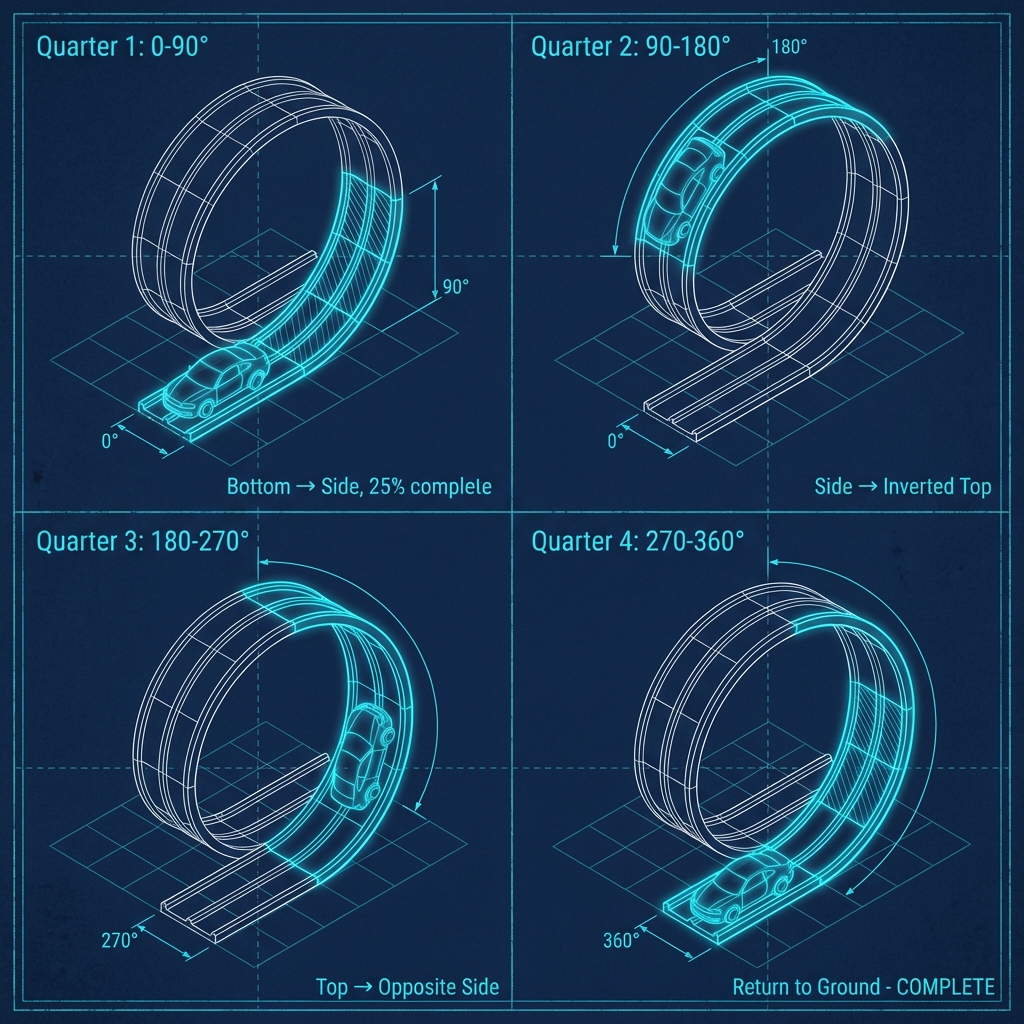
Phase 3: Construct the Loop (15-20 minutes)
Quarter 1 (0-90°): Bottom to Side
- Place first curved piece at loop entry, rotate 90° upward
- Continue upward curve until track is horizontal (sideways)
- Should use ~25% of total loop pieces
- Car orientation: upright → tilted 90°
Quarter 2 (90-180°): Side to Inverted Top
- Continue curve—pieces now "backward" from player view
- This is the inversion phase
- Stop when track is fully inverted (upside-down)
- Verify smooth curve—no harsh angles
Quarter 3 (180-270°): Top to Opposite Side
- Curve downward (still inverted)
- Gravity assists player here—lowest failure point
- Return to horizontal position (opposite side from Q1)
Quarter 4 (270-360°): Return to Ground
- Final quarter curves back to entry elevation
- Critical: Last piece must align perfectly with exit track
- Connection point should be seamless—no "bump"
Visual Check: Step camera back. Loop should look like perfect circle, not oval or egg-shaped.
Phase 4: Testing & Troubleshooting (10-15 minutes)
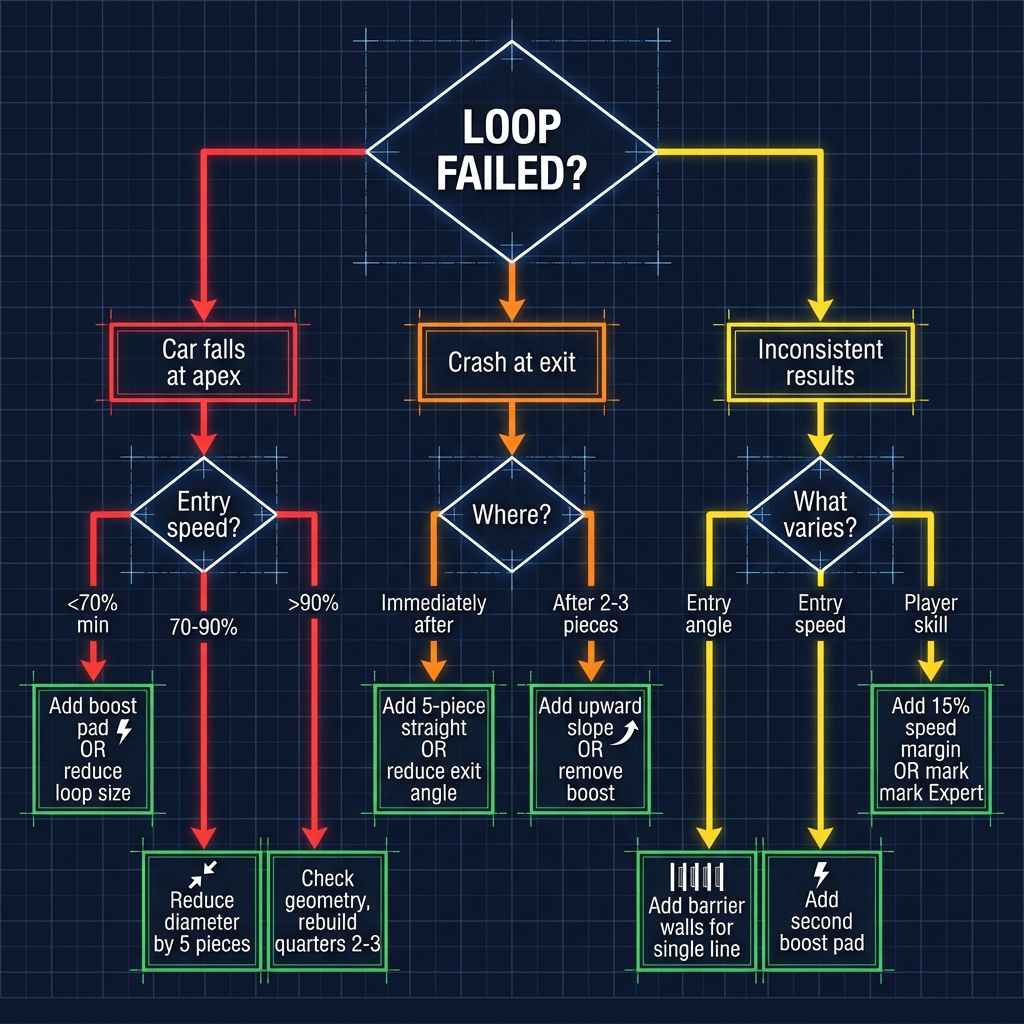
Initial Test: Run loop 5 times consecutively
If car falls at apex:
- Entry speed <70% required → Add boost pad OR reduce loop size 20%
- Entry speed 70-90% → Reduce loop diameter by 5 pieces
- Entry speed >90% → Check geometry, rebuild quarters 2-3
If crash at exit:
- Immediately after loop → Add 5-piece straight OR reduce exit angle
- After 2-3 pieces → Add gentle upward slope OR remove one boost
If inconsistent results:
- Entry angle varies → Add barrier walls forcing single entry line
- Entry speed varies → Add second boost pad OR remove pre-loop corners
- Player skill varies → Add 15% speed safety margin OR mark "Expert"
Target: 90%+ success rate across 20 test runs
Phase 5: Polish (10 minutes)
- Add visual elements around loop (decorative objects)
- Place checkpoint before loop entry (respawn point)
- Test from multiple approach angles
- Verify frame rate (complex loops can cause lag)
- Confirm "fun factor" (does it feel rewarding?)
Advanced Loop Design Techniques
Speed Preservation Loops
Challenge: Exit loop at same speed as entry (or faster)
Solution:
- Downward exit slope (-10° for 5 pieces = +15 km/h)
- Boost pad at loop apex (advanced—timing critical)
- Wider loop diameter (-5% friction loss)
- Entry from elevated position (convert height to speed)
Use Case: Speedrun tracks where every km/h matters
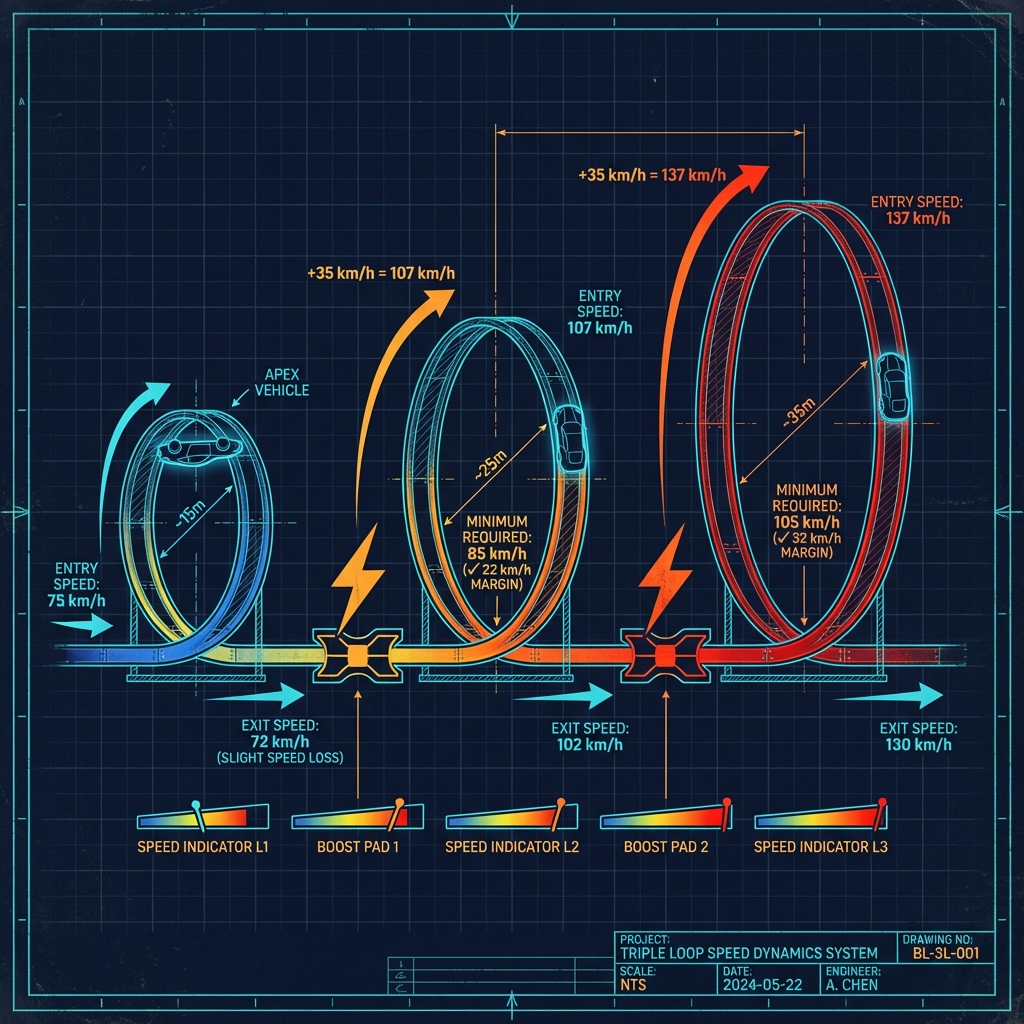
Chain Loop Systems
Challenge: Multiple loops requiring different speeds
Speed Calculation Example (from diagram):
- Loop 1 exit: 72 km/h
- Boost pad: +35 km/h = 107 km/h
- Loop 2 minimum: 85 km/h
- Safety margin: 22 km/h ✓
Key Principle: Exit speed from Loop N must provide safe entry for Loop N+1 after boost/friction
Pro Tip: Start with smallest loop (needs least speed), progressively increase size
Deceptive Loops
Challenge: Loop looks harder than it is (psychological challenge)
Techniques:
- Visual narrowing: Add walls on approach (looks scary)
- Hidden size: Large, easy loop behind visual clutter
- Camera tricks: Dramatic angles make loop appear steeper
- Scary decorations: Danger symbols, though loop is generous
Result: Players feel like heroes when completing an "impossible"-looking loop
💡 Design takeaway: The most-shared loop tracks usually look far more terrifying than they play. Building the loop a little larger than it appears keeps the completion rate high while preserving the intimidation factor that makes players want to share it.
Advanced Loop Variations
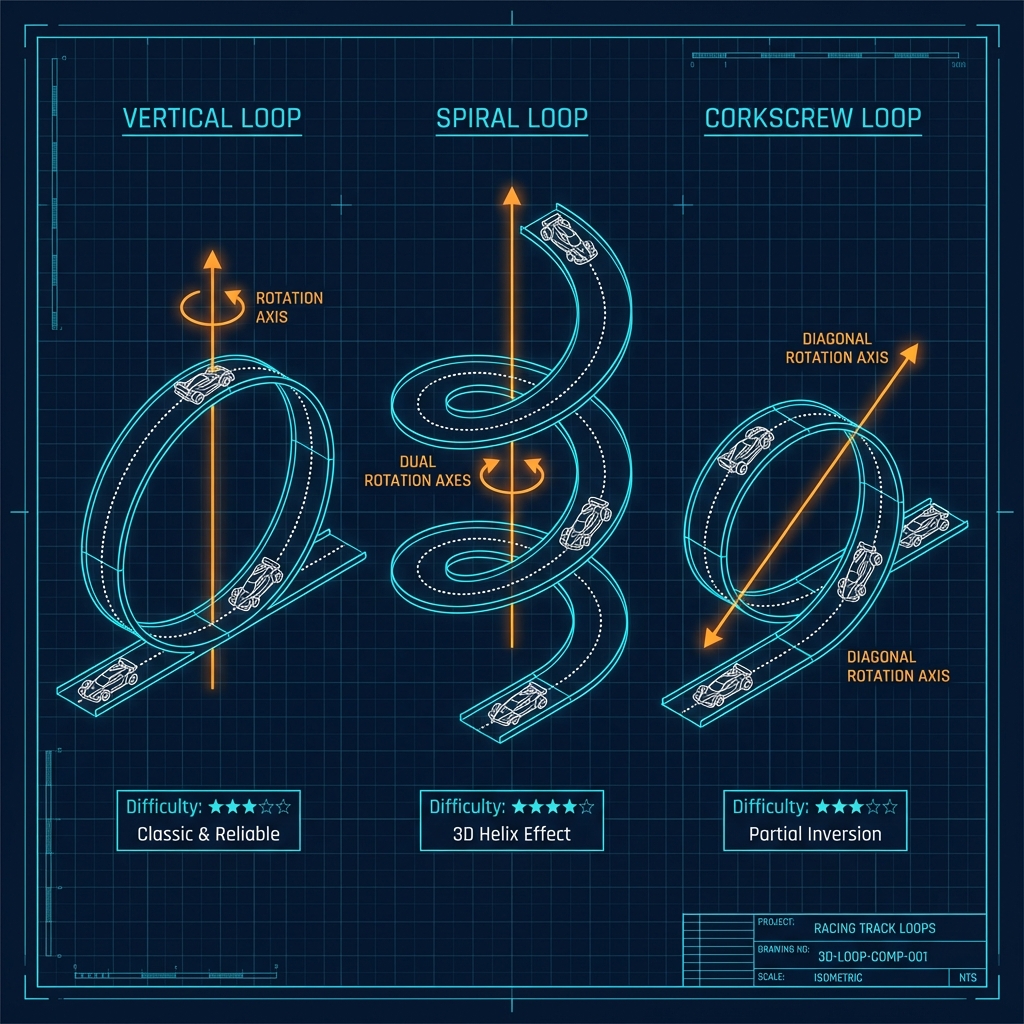
Spiral Loop (3D Helix)
Description: Loop that twists while rising, like DNA strand
Build Technique: Rotate track pieces on TWO axes simultaneously
- Vertical rotation: creates loop
- Horizontal rotation: creates spiral
Speed Requirements: 20% higher than standard loop (friction from twist)
Difficulty: ★★★★☆
Wow Factor: ★★★★★
Corkscrew Loop
Description: Loop rotates player 360° without full inversion
Build Technique: 45° angle throughout (never full 90° vertical)
Best For: Tracks where full inversion doesn't fit theme
Difficulty: ★★★☆☆
Player Experience: Unique rotation feeling
Figure-8 Loop
Description: Loop crosses itself at center point
Build Technique:
- Build two loops sharing one crossing point
- Requires precise height management (5m+ clearance)
- Extremely difficult—only attempt after mastering basics
Difficulty: ★★★★★
Community: Highly respected—fewer than 50 exist
Pro Creator Insights
💬 "The 3-Test Rule" - Test your loop three ways:
- Full speed (all boosts) - Should be easy
- Minimal speed (no boosts if possible) - Should barely work
- Random approach - Should be consistent
If all three pass, the loop is solid. - TrackMaster_Kyle
💬 "Speed Stacking Math" - For chain loops, I calculate exact speed gains:
- Loop 1 exit: 75 km/h
- Boost pad: +35 → 110 km/h
- Loop 2 minimum: 85 km/h
- Safety margin: 25 km/h (perfect!)
Math = predictability = player satisfaction. - SpeedPhysicsPro
💬 "The Apex Boost" - Advanced technique: Place boost pad at loop apex (top). Players get speed mid-loop, making huge loops possible with moderate entry. Feels magical when it works. Test exhaustively—timing is critical. - InnovatorDan
Common Loop Design Mistakes
Mistake #1: Insufficient Entry Speed
Symptom: Player falls at loop's apex
Impact: One of the most common reasons loop tracks fail
Fix: Add boost pad, increase approach, OR reduce loop size 20%
Mistake #2: Too Easy/Boring
Symptom: Players complete mindlessly
Impact: Low replay value, no shares
Fix: Remove unnecessary boosts, add pre-loop obstacle, OR increase size
Mistake #3: Awkward Exit Placement
Symptom: Complete loop but crash immediately after
Impact: Frustration despite success
Fix: Add 5-10 piece straight section after loop, test exit angle
Mistake #4: Inconsistent Success Rate
Symptom: Sometimes works, sometimes doesn't
Impact: Player confusion and abandonment
Fix: Add barriers forcing consistent entry line
Loop Integration by Track Type
Racing Tracks:
- Place loops on straightaways, not after corners
- Allow recovery space after loop (10+ pieces)
- Consider making loops optional shortcuts (risk/reward)
Speedrun Tracks:
- Loops should enhance flow, not disrupt it
- Optimize for fastest line through loop interior
- Test: Is loop faster than going around? (Should be)
Technical Tracks:
- Smaller, tighter loops for precision challenges
- Combine loops with drifts or tight corners
- A lower completion rate is acceptable here (these are meant to be harder than racing tracks)
Stunt Tracks:
- Spectacle over practicality
- Multiple consecutive loops encouraged
- Experimental sizes—push boundaries
Testing Checklist
Solo Testing:
- 10 consecutive successful completions
- Test at 80%, 100%, 120% recommended speed
- Verify exit leads naturally to next section
- Check frame rate (target: 60 FPS maintained)
- Confirm fun factor subjectively
Community Testing (before publishing):
- Share with 3-5 players of varying skill (beginner, intermediate, expert)
- Gather feedback on difficulty perception
- Ask: "Did the loop feel fair?"
- Iterate based on consistent feedback (not outliers)
Target Metrics:
- 90%+ completion rate (racing/speedrun)
- 60-80% completion rate (technical/expert)
- <3 attempts average to complete
- "Fun" rating >7/10
Publishing Your Loop Track
Once perfected:
- Export track code from PolyTrack editor
- Capture compelling screenshot (car mid-loop, dramatic angle)
- Write title emphasizing loops: "Triple Loop Challenge" or "Sky-High Loop Adventure"
- Set difficulty rating honestly (test-based)
- Submit via track submission form
Title Best Practices:
- Mention number of loops if 2+
- Use power words: "Challenge", "Extreme", "Master"
- Keep under 50 characters
Description Template:
"Test your skills on [number] consecutive loops! Full boost approach required. Moderate difficulty, high satisfaction. Estimated clear time: [X] seconds. Best for intermediate players looking to improve loop technique."
Next Steps for Loop Masters
Continue Learning:
- Track Creation Basics - Editor fundamentals
- Speedrun Optimization - Integrate loops with speed
- Drift Techniques - Combine drifts + loops
Recommended Practice Tracks:
- Search Stunt category for loop inspiration
- Study "Loop Paradise" - Progressive difficulty showcase
- Analyze "Chain Reaction" - Perfect consecutive loop balance
Final Wisdom
Great loop tracks share four qualities:
- Fairness: Players feel in control, not at mercy of RNG
- Clarity: Obvious what player should do (approach speed, line)
- Satisfaction: Completing loop feels rewarding, worth the challenge
- Flow: Loop integrates naturally with surrounding track sections
The Creator's Mantra: Start simple, test thoroughly, increase complexity gradually.
The PolyTrack community values well-crafted, reliable loops over ambitious but frustrating designs. A single perfect loop beats five broken ones.
Ready to build? Start with a 20-piece vertical loop using Classic Straight layout. Master that foundation, then explore variations. Share your creation at PolyTrackCodes.com!