The Track Builder's Bible: Advanced Guide to Creating Pro-Level PolyTrack Maps
Go beyond the basics with the definitive advanced guide to building PolyTrack maps. Master modular construction, visual cue design, flow theory, difficulty calibration, and the complete publish-to-community workflow.
The Track Builder's Bible: Advanced Guide to Creating Pro-Level PolyTrack Maps
The difference between a downloaded track and an ignored track? Design mastery.
Thousands of PolyTrack tracks get created. A handful get shared, played, and remembered. This guide teaches you what separates community favorites from forgettable maps—covering the professional methodology used by top creators whose tracks consistently reach 1,000+ downloads.
What You'll Learn:
- ✓ The 6-phase professional track design workflow
- ✓ Modular construction: building reusable segments
- ✓ Flow theory: why some tracks feel amazing and others don't
- ✓ Visual cue design: guiding players without hand-holding
- ✓ Difficulty calibration: how to design for your target audience
- ✓ Playtesting methodology: how to catch problems before publishing
- ✓ The publish-and-iterate strategy
Skill Level: Beginner to Advanced (most valuable for creators with 5+ tracks made)
Time Investment: 3–6 hours per high-quality track (yes, really)
Why Most Tracks Fail
Before learning what to do, understand what goes wrong.
The #1 failure mode of amateur tracks is designing for the creator, not the player. Creators know the track's secrets intuitively. They don't experience blind corners, unclear direction, or checkpoint gaps the same way first-time players do.
The Three Fatal Track Mistakes:
1. The "Death Trap" problem: Sections where even perfect execution leads to crashes. These feel unfair, not challenging. Players quit and never return.
2. The "Flow Killer" problem: Random shifts in rhythm that feel jarring. A beautiful technical section followed by a sharp 180° hairpin with no warning creates whiplash, not challenge.
3. The "Where am I going?" problem: Unclear visual direction. Players spend mental energy finding the path instead of executing it. This isn't difficulty—it's confusion.
Top-rated community tracks solve all three problems. This guide shows you how.
Phase 1: Pre-Build Planning (30–60 minutes)
The biggest time investment in professional track design happens before touching the editor.
Define Your Track Concept
Answer these questions before building:
1. What is your track's "identity"? Every great track has one dominant feeling. Choose one:
- Speed cathedral: long straights, sweeping curves, minimal obstacles. Feeling = freedom.
- Technical puzzle: tight sections requiring precision. Feeling = satisfaction.
- Stunt showcase: jumps, loops, drama. Feeling = spectacle.
- Drift paradise: flowing corners optimized for slides. Feeling = rhythm.
- Climber: vertical progression, platforming elements. Feeling = achievement.
Hybrid identities work after 20+ tracks. For now: pick one.
2. Who is your target player?
- Beginner (completion rate target: 80%+)
- Intermediate (completion rate target: 60–75%)
- Expert (completion rate target: 30–50%)
- Elite (completion rate target: sub-20%)
3. What is your track's signature moment? Every memorable track has one section players remember and share. Plan this first, then build the rest to support it.
Sketch the Flow Chart
Before the editor: sketch your track's rhythm on paper (or mentally):
The Rhythm Formula for Engaging Tracks:
- Open section (acceleration, breathing room)
- Technical section (focused precision required)
- Spectacle section (a notable obstacle or view)
- Recovery section (easier breathing before finale)
- Finale (your signature moment, the climax)
Not every track needs all five. But tracks that have no recovery sections burn players out. Tracks with no spectacle get forgotten.
Phase 2: Modular Construction
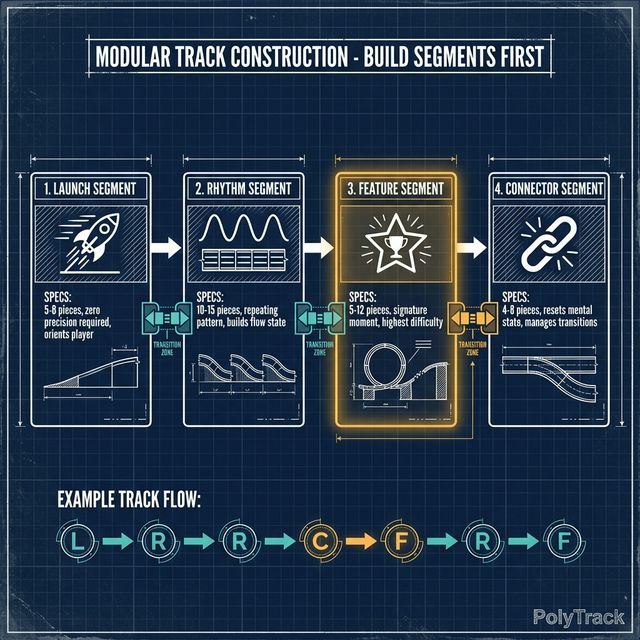
This is the #1 technique that separates fast builders from slow ones—and good tracks from great ones.
What Is Modular Construction?
Instead of building your track piece by piece from start to finish, you build standalone segments and connect them.
A segment is 8–20 pieces that:
- Start at full speed (as if entering from a straightaway)
- End at solvable speed (not a wall or cliff)
- Have a clear internal rhythm
- Can be tested independently
The Four Segment Types
1. Launch Segment (mandatory, first segment only)
- 5–8 pieces from spawn to first real challenge
- Purpose: Orient the player, build some speed
- Design rule: Zero precision required in launch segment
2. Rhythm Segment (use 2–4 times per track)
- 10–15 pieces, repeating a clear pattern
- Example: curve-straight-curve-straight or jump-technical-jump
- Purpose: Build the "flow state"—the feeling of being in sync with the track
3. Feature Segment (1–2 per track)
- Your signature moment(s)
- 5–12 pieces, highest difficulty spike
- Must be preceded by a recovery section so players arrive at it fresh
4. Connector Segment (between others)
- 4–8 pieces, transitioning between rhythm and feature
- Purpose: Reset player's mental state, prevent burnout
Building and Testing Segments Independently
This is the critical step most builders skip.
For each segment you build:
- Only build the segment pieces
- Use the editor's test function
- Complete the segment 5 times successfully without crashing
- If you crash more than 2 of those 5 times → redesign the segment
A segment that you (the creator who knows it perfectly) can't complete 3/5 times is not a segment—it's a wall.
Connecting Segments
When joining segments, test the transition:
- Exit speed of Segment A must be appropriate for entry of Segment B
- If Segment A ends fast and Segment B starts with a tight corner → add a deceleration zone (3–5 straight pieces)
- If Segment A ends slow and Segment B needs speed → add an acceleration boost area
The 2-Piece Test: Add 2 neutral pieces between segments, test the flow, then remove them if unnecessary. This reveals connection problems.
Phase 3: Visual Cue Design
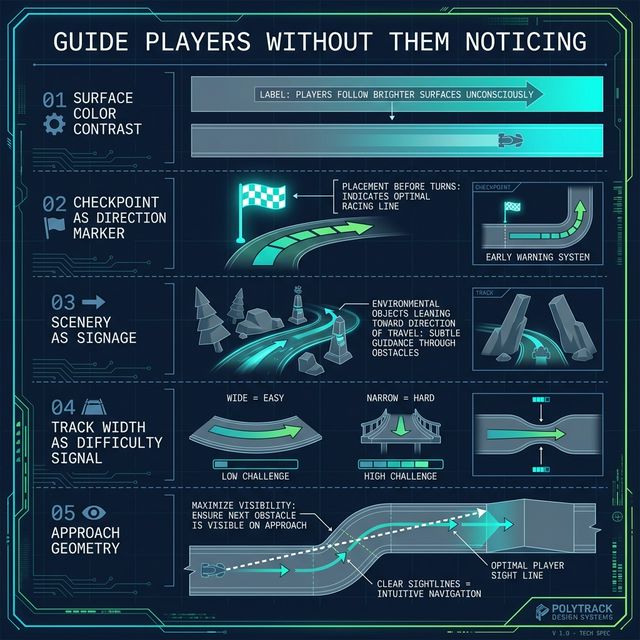
Players should never have to guess where to go. They should feel guided without noticing the guidance.
The Five Visual Cue Tools
1. Surface Color Contrast Different track surface colors "pop" against each other. Use this deliberately:
- Straightaways: Neutral color (gray, white)
- Danger zones: Slightly warmer tone
- The intended racing line: Slightly brighter or more saturated
Players follow brighter surfaces unconsciously. This is not cheating—it's UX design.
2. Checkpoint Placement as Direction Markers Checkpoints don't just save progress—they communicate "this is the path." Strategic placement:
- Just before confusing direction changes
- After blind corners where players might not see the continuation
- Never place checkpoints where the path is obvious
3. Scenery as Signage Use environmental pieces to frame the track:
- Objects beside the track should "lean toward" the direction of travel
- Objects flanking a sharp turn emphasize the turn
- Open sky on one side = "you might fall here" (unconscious danger signal)
4. Track Width as Difficulty Signal Wide sections = easy, player can relax. Narrow sections = hard, player focuses.
Consistent width throughout = no cues, player doesn't know when to focus. This creates anxiety, not engagement.
5. Approach Geometry Before a complex obstacle, orient the track so players see it from the optimal approach angle. Blind obstacles (can't see until 1–2 pieces away) require either:
- Very simple execution, OR
- A visual warning (color change, width change) 2–5 pieces before
Phase 4: Difficulty Calibration

Difficulty in PolyTrack has three components. Most creators only think about one.
The Three Difficulty Components
1. Execution Difficulty (most creators focus here)
- How hard is it to physically execute the required input?
- Loop at 60 km/h vs. loop at 90 km/h = wildly different execution difficulty
- Measured by: How often does the correct input succeed?
2. Reading Difficulty
- How hard is it to understand what input is required?
- Increases with: blind corners, misleading visual cues, unclear direction
- Measured by: How many attempts before players understand the correct approach?
- Beginners: Reading difficulty should be near-zero
- Expert tracks: Small amounts of reading difficulty can add depth
3. Consistency Difficulty
- How often must the player execute perfectly over an extended run?
- A 5-jump track where every jump is easy but all five must succeed in sequence has high consistency difficulty
- Measured by: What % of clean sections result in a clean full run?
Professional difficulty targeting:
| Rating | Execution | Reading | Consistency |
|---|---|---|---|
| Easy | Low | Very Low | Low |
| Medium | Medium | Low | Medium |
| Hard | High | Low-Med | High |
| Expert | Very High | Medium | Very High |
| Impossible | Maximum | High OK | Extreme |
The "Difficulty Spike" Problem
Amateur tracks often have one section that's 3–4 difficulty levels above the rest. This spike:
- Breaks immersion ("the track changed games suddenly")
- Causes disproportionate abandonment
- Makes players feel the track is unfair
Fix: Graph your track's difficulty over time. If any section is more than 1.5 difficulty levels above the track average, rework it.
Calibrating for Unknown Players
You cannot rely on your own execution to calibrate difficulty. You're too good at your own track.
The 5-type tester standard: After building, have (or imagine) 5 different player types test it:
- Complete beginner (has never beaten an Easy track)
- Casual player (plays once a week, beats Medium regularly)
- Regular player (daily player, comfortable with Hard)
- Experienced player (100+ tracks, competitive times)
- Elite player (speedrunner, WR-level)
If your target is Medium difficulty, the casual player type should be able to complete it on their 5th-10th attempt. If they can't → reduce difficulty.
Phase 5: Playtesting Methodology

Playtesting is not playing your track until it feels good to you. It's structured testing with specific objectives.
The 3-Pass Playtesting Protocol
Pass 1: Completion Test Run the track 10 times from a fresh start (don't use your muscle memory—pretend it's the first time).
Success criteria: You can complete it 7/10 times without crashing on the hardest section.
If you fail this test: The difficulty is too high for your target audience. Identify the crash-causing section and reduce its difficulty.
Pass 2: Flow Test Run the track twice, focusing purely on how the transitions feel.
Ask yourself after each run:
- Were there any moments of surprise? (Could be positive or negative)
- Did the rhythm ever break? (Always negative)
- Did any section feel longer or shorter than expected? (Pacing issue if wrong)
Success criteria: No rhythm breaks, transitions feel intentional.
Pass 3: Direction Test Run the track once at half-speed, actively trying to go the wrong way at every opportunity.
Are there places where a player could easily go off-course? If yes: add visual cues to those sections.
Success criteria: The intended path is always the path of least resistance.
Common Playtest Findings and Fixes
| Finding | Fix |
|---|---|
| Everyone crashes at Section 4 | Reduce speed requirement or add more approach pieces |
| Players getting lost at the jump section | Add checkpoint or surface color guide |
| Nobody gets stuck but the track feels "flat" | Replace one rhythm section with a feature segment |
| Track runs fast then suddenly slow | Check transition pieces between fast/slow segments |
| Beginners quit at 60% completion | Move the hardest section to 80%+ of the track |
Phase 6: Publishing and Community Iteration
A published track is not a finished track. Community feedback reveals things 100 playtests miss.
The Track Description Formula
Most creators write nothing or "have fun!" A professional description includes:
- Difficulty: "Rated Hard — requires consistent drift chains"
- Recommended skill level: "Comfortable with Medium stunt tracks suggested"
- Your signature moment: "The loop-to-gap-jump at the finale is intentionally difficult"
- Creator intent: "Designed for flow over raw speed"
- Version: "v1.2 — adjusted final section based on feedback"
Reading Community Feedback
When players share times and feedback, patterns reveal design issues:
- Everyone's time is within 2 seconds of each other → Track lacks depth (good or bad depending on intent)
- Top times are all using the same line → Track has only one viable approach
- Many players report crashing at Section X → Section X needs redesign regardless of your intent
The Iteration Schedule
- Day 1: Publish, share the code on the community
- Day 3: Review feedback, identify the most common complaint
- Day 5: Publish v1.1 fixing the top 1–2 issues
- Day 14: Consider v1.2 based on extended community play pattern
Advanced Design Concepts
Risk-Reward Shortcuts
The best expert tracks include intentional shortcut routes that:
- Save 1–3 seconds if executed perfectly
- Have a high failure rate (50–70%)
- Are NOT required to complete the track
These shortcuts give competitive players something to discover and attempt while keeping the track accessible.
Anti-Cheap-Death Design
A "cheap death" is when a player crashes due to track design, not player error. Specifically:
- Invisible walls behind track pieces that catch players unexpectedly
- Understated hazards (looks safe, kills instantly)
- Camera-blocking pieces that hide the intended line
Eliminate all cheap deaths before publishing. A player who dies cleanly respects the track. A player who dies to bad design leaves a negative review and never returns.
Replayability Design
Tracks with high replay value share common traits:
- Multiple viable approaches to at least 2 sections
- One true "optimal" line that requires discovery and practice
- Ghost comparison that's meaningful (comparing your ghost to WR shows clear learning opportunities)
- Segments that reward skill as players improve
Your Track Builder Toolkit Checklist
Before publishing any track, verify:
Completion Checks:
- ✓ Completable by someone at your target difficulty level
- ✓ No cheap deaths (tested every wall edge)
- ✓ All checkpoints placed before difficult sections
- ✓ Clear visual direction throughout
Flow Checks:
- ✓ At least one recovery section after every hard section
- ✓ Transitions between segments feel smooth
- ✓ Track has a clear finale / signature moment
Meta Checks:
- ✓ Difficulty rating is accurate
- ✓ Description written (see formula above)
- ✓ Track code tested on a fresh session (code sometimes breaks on export)
Ready to build your best track?
Share your creations with the PolyTrack community and submit them to our site. The best community-made tracks get featured on our homepage and in our weekly picks.
- Submit Your Track — Get featured!
- Browse Community Tracks — See what's popular
- Speedrun Your Own Track — Compete against yourself
- Basic Track Creation Guide — Revisit the fundamentals